So this past week or two I’ve been playing quite heavily with Citrix XenServer and found it has a few little quirks that weren’t fully documented anywhere.
Continue reading XenServer Quirks part 2
All posts by Luke
ChromeCast Unboxing
So I just bought a ChromeCast since they’re now available in Australia, and I thought I’d take a few snaps of it’s unboxing and setup.


The contents (Price in is AU$)
It has basically 2 connections, HDMI and a microUSB to power it. It comes a USB to microUSB cable and a 240v Australia power adapter.
The microUSB end looks slightly different compared to some of the others I have but I tested and an android phone charger powered it up fine so not sure what that’s about.


The left is a standard microUSB cable I had lying around the right is the ChromeCast’s microUSB plug.
It also comes with what appears to be some sort of HDMI extender I presume if your TV’s HDMI port is hard or awkward to reach. I didn’t use that but assume it’s just a straight pass through.


Here it is plugged into my Sony Bravia TV. It stick out a bit plugged in there so I’ll probably play around with the best spot. Or reality I’ll probably move it between TVs as I need.
This is mostly the quickest and easiest place to plug it in so it’ll do for now.


You can just make out a red light in the second photo, it stayed red during the install and powering up part. Once it all seemed to be working and connected to WiFI it changed to a plain white light.
Not sure if there’s other colours and what they all mean, that’s a job for another day.
After selecting the correct TV input (HDMI 2 on mine) you’re presented with this screen

So I did what it said and went and downloaded the App. Note:, this step must be done from a device that has Wi-Fi, as it initially makes a peer to peer connection with the ChromeCast to set it up, after that you can then use any PC or device. The App was a simple install from Google Play, and when you open the it you get a setup screen to continue configuring the ChromeCast


When you hit the continue button the App goes searching for nearby devices and will present you a code to make sure the device you’re setting up matches and is the correct one. (I missed getting a shot of the TV but it showed the same code.)

The Phone app then proceeded to ask me for a name to call the device and my Wi-Fi password so it could continue setting up the ChromeCast.


Given my phone has my Wi-Fi password stored like most people’s do I’m guessing why it can’t auto fill this or ask do you wish to use the same Wi-Fi connection as your phone I’m not sure. Still not too hard a job to enter a Wi-Fi password but I can see some people struggling to remember their Wi-Fi password if they’re used to just using the auto button Wi-Fi connect thing.
After it was connected to the Wi-Fi it went off to download some firmware updates or patches or something, so make sure your internet is up and running and preferably fast so you don’t have to wait half an hour, the update did seem quite sizeable but I didn’t check how much it downloaded so not exactly sure on size.


After it completed it’s reboot it was all ready to go.


So the moment of truth I installed the ChromeCast extension into Chrome on my PC as a test. It supports NetFlix, youTube, Pandora as well as Google Music and others. I’ll give those a test once I have a bit more time, for now I was going for easy.

Again Google Cast Chrome extension install was fairly straight forward. Just go to the Chrome Extensions Web store and search for “Google Cast” or click here then follow the bouncing ball.
Once it’s installed you get a new icon in the top right of your browser to cast to any connected ChromeCast device. Open your favourite webpage and click to cast it to the device you’d like.

Once connected you’ll see a blue square on the browser tab to show it’s being Cast, and the icon in the top right will also change to blue.

You can also right click on the blue icon to change various settings like the bitrate, wether sound is also sent to the ChromeCast, or to stop sharing a tab to your TV.


And here’s what it looks like on my Sony Bravia HD LED TV. Picture was taken with my Galaxy S4 so not the best representation but as you can see it’s a pretty good picture quality.

The text was readable, no artefacts or picture blurring noticeable, and the colours looked pretty accurate. Then I guess that’s to be expected given it’s HDMI and a fairly good res. It’s a bit of a pity they didn’t make it do 1080 given most TVs these days handle 1080. Like the 480 option on the Google Cast App they could always have it scale down for TVs that can’t handle 1080. Maybe it is there somewhere and I just need to do more digging? Or maybe they can release it in another update in the future?
Final Thoughts
That’s It for the quick unboxing I’ll certainly be having a further play with it over the next few days so I’ll probably update with anything good or bad I find about it. For a device that costs $50 it seems quite capable, it was very easy to install and setup, and if you don’t already have a Smart/Connected TV or a home media setup already it’ll transform your TV into a net connected, movie playing machine with bugger all work.
If you’re also on the road or travelling a bit it’d be very handy for watching movies on a decent TV, or doing presentations in meetings without having to carry all sorts of cables and adapters.
RANCID 3.1
Just found a very annoying bug in RANCID 3.1, which also exists in RANCID 3.0 All the documentation for the proper configuration of your router.db file says it must be in the format
hostname:manufactuer:statusHowever when trying to do a rancid-run it fails to process any hosts and marks all the devices as down. After a lot of trolling through the control_rancid script and some Perl gymnastics I discovered it was looking for a ‘;’ as a separator. Once changing the config file to use a semicolon it works flawlessly. Knowing this a quick google did discover that it is listed in some threads e.g from http://www.shrubbery.net/pipermail/rancid-discuss/2012-October/006541.html
router.db,rancid.types.*: change field separator to ‘;’ (semi-colon) to allow for IPv6 addresses in router.db and avoid conflict with :s in device commands and perl module names
However all the official documentation still refers to using a colon http://www.shrubbery.net/rancid/man/router.db.5.html So be warned if using RANCID version 3.0 or above you will need to update your router.db files accordingly.

Unable to assign D: on Windows Server
I recently had a minor issue trying to assign a drive letter to a newly attached drive. Technically is was a Virtual Disk under XenServer but that’s mostly irrelevant.
The symptoms were that under “Disk Management” I could see the new drive, create a partition and correctly format it as NTFS. However when I tried to assign it a drive letter I could see all the letters of the Alphabet except C, Z and the letter I wanted D. The C and Z missing were expected as there was a System disk and a DVD drive assigned to the VM. A check of Device Manager confirmed that there was no additional disks or CD/DVD dives assigned to the server.
I dropped to dos and ran ‘net use‘ to check if there were somehow so network drives mapped that I didn’t know about (there wasn’t) and I also ran ‘subst‘ to make sure there was no drive substitution going on, subst indicated that there was no drive substitutions so I was stumped.
I dug into the registry and check HKLM\System\MountedDevices and saw like everywhere else only C and Z in use under DosDevices. I thought I’ll try and map a network drive and see what that yields, oddly enough D: did show as an available letter but when I tried to map to D: though it failed, and it could map correctly to another letter so permissions were fine.
About this time I remembered one of the other guys was talking about needing to create a subst drive for something he was testing, so I checked with him and sure enough he’d created a substituted drive the day before. Knowing this the fix was then simple. We logged onto his account and sure enough there was a subst drive, we removed it and bingo we could now assign the New disk the drive letter D:.
What was interesting though is even as an administrator I couldn’t see this drive letter in use on another account, NET USE equivalent apparently also thought it wasn’t in use, but was kind of still in use, and most tellingly even under the HKLM (Local machine not HKCU) it didn’t show in MappedDrives.
I can also find no reference of this behaviour anywhere on Microsoft’s site or anywhere else on the web. It’s possible it’s a bug or was some other weird/unexpected behaviour but I don’t really feel like opening a Microsoft case to confirm it I just wanted my disk appearing in Windows
Peculiarity rewriting HTTPS in IIS8
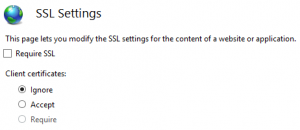
Playing with rewrite rules in IIS8 and trying to get it to redirect http request to https, I found that if you have the “require SSL” tickbox selected it will not process your https rewrite rules.
For reference here’s the rule which worked perfectly once I disabled the require SSL setting.
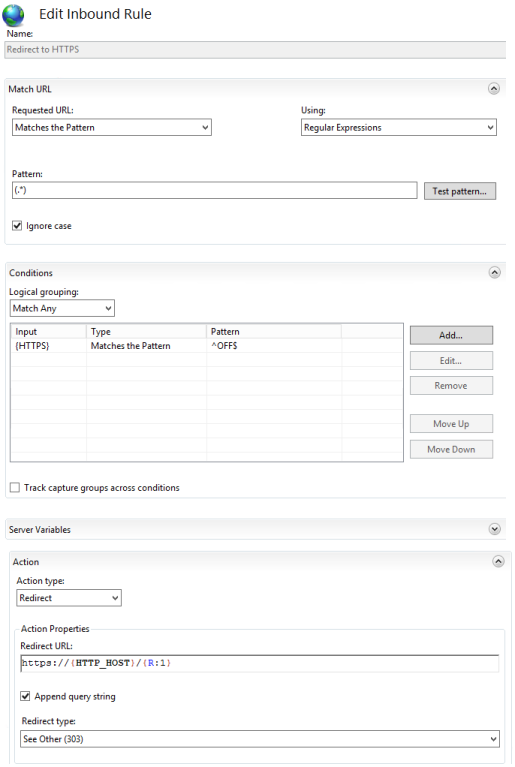
Or in an easier to copy format here’s the web.config file
Note: It probably exhibits the same behaviour in IIS7 and earlier, I just never bothered to test those, I was only using IIS8.
Here’s the link to IIS rewrite as well for those interested